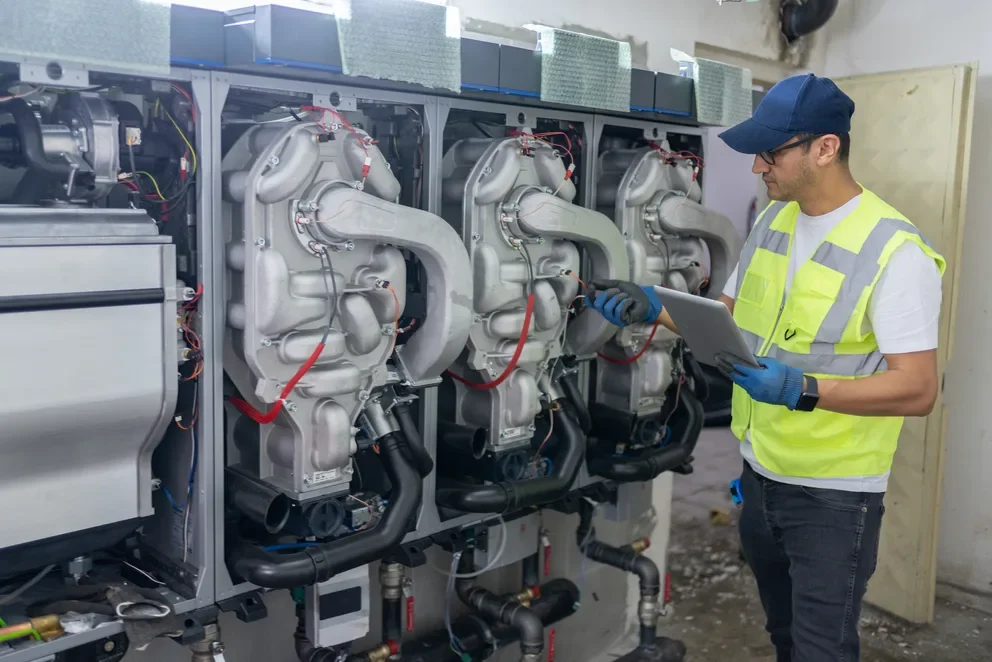


A callback can wipe out a clean week. Not because your techs lack skill, but because intermittent faults, rushed notes, and fragmented handoffs turn a fast diagnosis into a second trip. In the HVAC industry, an HVAC troubleshooting simulator gives experienced crews a controlled way to practice sequences, tighten decision-making, and standardize how findings flow back into field service management.
Pair that with automation that captures readings, photos, and next steps inside the job record, and your team spends less time re-proving the same problem on visit two. Here’s what we’ll cover:
- What is an HVAC troubleshooting simulator?
- How an HVAC electrical troubleshooting simulator works
- How to use an HVAC troubleshooting simulator
Troubleshooting sits between the field and the office. Your tech needs a repeatable path to confirm the fault, and your dispatch and parts team needs clear notes to back them up. Up next, we will walk through what an HVAC troubleshooting simulator is, how it runs through real service scenarios, and how to put it to work with your field service management process.
What is an HVAC troubleshooting simulator?
An HVAC troubleshooting simulator is a digital practice environment that recreates real service faults so HVAC techs can run diagnostics, verify sequences, and sharpen decision-making for maintenance, repair, installation, and startup without risking live equipment during a service call in-field.
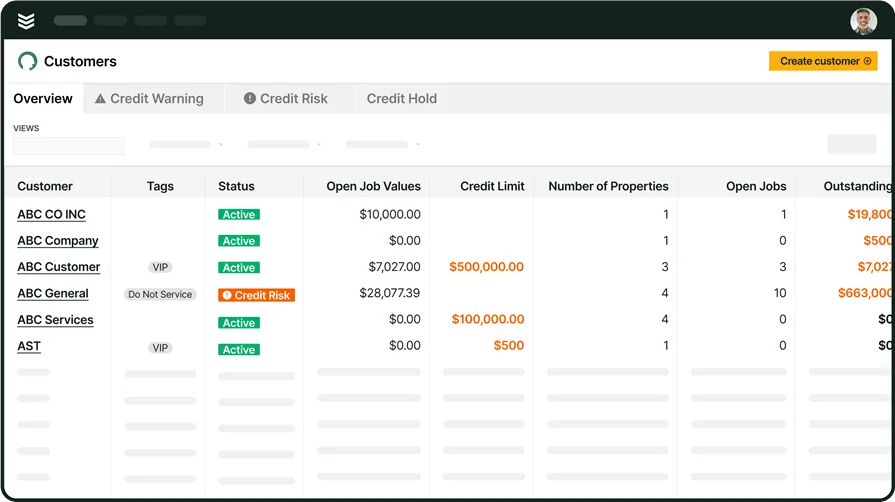
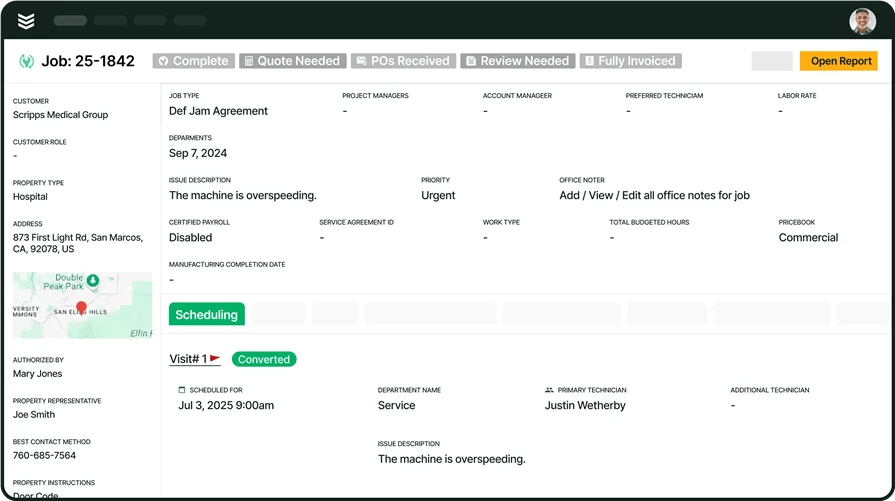
Pair it with HVAC service software, and the work connects end to end: dispatch assigns the call, techs follow consistent checks, log readings and photos, flag parts, and leave clean notes tied to the asset history for the next visit.

How an HVAC electrical troubleshooting simulator works
An HVAC electrical troubleshooting simulator runs a realistic control scenario on a screen, then forces you to prove the fault with the same logic you use in the field. You work from a wiring diagram and sequence of operation, take readings at test points, and watch the circuit respond when you open a safety, lose a call, drop a transformer leg, or chase an intermittent input.
- Select the scenario: Choose the equipment type and fault (no start, trips on safety, short cycle, intermittent shutdown)
- Set your baseline: Review the wiring diagram and sequence, then confirm expected line voltage, 24V control power, inputs, and outputs
- Take readings and verify logic: Use simulated meter readings at key points, check continuity where it matters, and confirm what the board, relay, or contactor coil actually sees
- Isolate the root cause: Rule in or rule out safeties, switches, relays, contactors, boards, and sensors, then test the corrective action (reset, adjust, replace)
- Validate the fix: Run the full sequence again under the same conditions, confirm stable operation, and document the cause plus any follow-up parts or checks
That flow mirrors a clean service call: confirm the symptom, prove the path, fix the cause, then validate the sequence. Next, we will get into how to use an HVAC troubleshooting simulator on active jobs so tech notes, parts needs, and follow-ups stay tight from dispatch to closeout.
Take control of your HVAC service
See how BuildOps helps HVAC techs troubleshoot faster and close jobs.
How to use an HVAC troubleshooting simulator
A simulator pays off when it matches how your shop runs service. Think of it as a repeatable drill that sharpens how techs diagnose, document, and hand work back to dispatch, parts, and billing. Use it like you use a good checklist: consistent, quick, and tied to real equipment your team touches every week.
1. Onboard staff faster and with fewer callbacks

Start new techs on the same fault patterns your seniors see in the field. Set a clear target for each session: confirm the symptom, pick the first test points, prove the failure, then verify the sequence. Keep the debrief tight. Ask what they checked first, what they expected to see, and what data changed their mind.
2. Give crews practical reps that match live dispatch
Pair each simulation with the same job flow your team follows on a service day. Assign a “work order,” run the scenario, then require a closeout note that a dispatcher can route without a phone call. If you want a clean reference for that structure, this HVAC work order app resource mirrors the kind of job record that keeps troubleshooting steps and outcomes in one place.
3. Train techs to capture asset details before they start guessing

A lot of “mystery faults” start with missing equipment context. Build a habit: identify the asset, confirm model and controls, then troubleshoot. In the simulator, require techs to log key identifiers and access notes before they take the first reading. That discipline carries into quoting and replacement scope later, which is where a solid HVAC bidding guide helps align field notes with what estimators need.
4. Run routine simulations to keep diagnostics consistent across the crew
Set a cadence that fits service reality. Short sessions beat long classroom blocks. Rotate through seasonal and repeat offenders: pressure switches, condensate safeties, low-voltage shorts, contactor issues, and sensor drift. Tie each drill to a planned check your team already performs. This HVAC maintenance schedule outline supports that approach by anchoring simulations to the inspections that prevent the next failure.
5. Make documentation part of the drill, not an afterthought

Your best tech can solve the problem and still leave the office blind. In every scenario, require three things: what failed, how they proved it, and what they did to confirm the fix. Keep it readable for the next person who opens the job. For a simple structure to follow, this HVAC service report guide lays out the kind of reporting that supports troubleshooting work and reduces back-and-forth.
6. Practice the handoff from diagnosis to customer options
Troubleshooting ends when the customer understands what happened and what it takes to fix it. Use simulations that end in a decision point: repair now, temporary restore, or replacement recommendation. Have techs write the scope in plain language and include the verification step. Then align that with how your office prices and presents work. This HVAC pricing software resource fits here because it shows how consistent line items depend on consistent field inputs.
7. Close the loop so billing and follow-ups run clean

Treat “job complete” as part of troubleshooting. In the simulator, require a final package: key readings, photos, parts used, and any return-visit triggers. That keeps service history usable and protects margin when a unit fails again months later. If you want the closeout tied to how invoices get approved and sent, this HVAC invoicing guide connects documentation habits to faster, cleaner billing.
When your crew treats troubleshooting like a repeatable drill, everything in the field starts to run tighter. Techs stop “shotgunning” parts and chasing maybe-fixes. They roll up, pull the history on their phone, and actually prove the symptom before they touch a wrench. Read the pressures and temps, check the low-voltage, test the circuit, confirm the fix, and log what changed. Same routine, every call. That is exactly where the right software stops being “extra admin” and actually helps close tickets.

With BuildOps, techs have a playbook in their pocket:
- See the full unit and site history before you even step out of the truck.
- Follow a consistent troubleshooting flow instead of guessing: readings, tests, likely causes, and recommended fixes.
- Snap photos, record readings, and drop them straight into the work order while you are at the condenser or air handler.
- Build clean, specific parts lists so the shop is not calling back asking, “Which board?” or “Which motor?”
Because everything is tied together in one system, you are not bouncing between three different apps or calling the office to fill in gaps. BuildOps keeps the whole chain tight:
- Work order comes in with clear symptoms and priorities.
- Tech follows a repeatable troubleshooting flow in the field.
- Estimates, pricing, and recommendations pull right from what the tech actually found.
- Service reports go out clean with photos, readings, and notes that make sense to the office and the customer.
The result: more first-trip fixes, less callbacks, fewer “no trouble found” tickets, and a lot less phone tag between techs, dispatch, and the shop.
If you want to see what this looks like in a real workflow—how a tech actually uses BuildOps on a live service call—you can hop on a quick demo. No pressure. If it fits how you run service, great. If not, you still walk away with a tighter playbook for troubleshooting and training your team.
Run tighter field ops, start to closeout
We connect field techs with office staff, so maintenance work runs smoothly.